This is what happens when you unload the car, bring everything inside, and set the mailbox down so that you can install it later, only to be resigned to returning to the other house after dark. I ran over my brand new mailbox. Sad day. I ran and got another one, but I’m still not happy with the set-up. I’m not smart enough to figure out how to get the pieces together. The post is different than the mailbox, and they don’t go together well. Maybe I’ll get my husband to look at it SOMEtime in his busy schedule. I’m sure the mailman would appreciate not always having to deal with the entire mailbox falling in his lap every time he opens it.
I confess, I’m pretty stoked with how this house is turning out. Even without power in the master bath. I’ve never been in a house I could totally make my own before! Never. And I’m loving the chance. Plus, who knew that I was so good at painting walls and ceilings and floors?
We painted the floors the other day, so they’d have time to dry. I don’t think they helped as much as I wish they had. To me, this house still smells “vacant.” Stale. Maybe it’s because there’s no stuff in it. I don’t know.
Believe it or not, it was the floors that ended up being the messiest. I’ve officially decided that oil-based paint is NOT the way to go, unless, like us, you’re trying to trap in odors. And if, like us, you have to use it, I highly recommend throwing everything away afterwards. I swear it took a whole day just to clean out the paint roller. And there’s no saving my shoes. or my pants.
But painting floors white is boring. Lets get to my awesome bragging, shall we?
Don’t mind the mess on the counter. It was the ONLY surface to set stuff down on.
First, on to proper attire for painting ceilings. It’s totally tacky, but did you know that baby shirts make great hair turbans? I wasn’t about to be pulling paint globs out of my hair, and this baby shirt was laying in my scrap fabric pile, so I ran with it. Worked great, actually. Just don’t go out in public with a baby shirt on your head. It’s weird.
Started with the girly’s room. I wanted to start with the most urgent, just in case it took longer than expected (since EVERYTHING else has), so we went with her ceiling, our ceiling, her wall, and our wall. There are other rooms I want to paint, but they can wait until after the big move. Taped her walls off, and started painting!
I wish the color had a bit more blue, but the kiddo loves it, and it’s not bad. I just wish it were a bit less green.
I don’t know why ALL of these pictures are in portrait. Sorry. I try to take landscape!
Anyway, I put her clouds up, and then went back to add detail (if I ever have to paint clouds again, I will focus on one whole cloud, details and all. going back and adding texture was not as smooth a process as I thought it would be in my head). I only added it to one, and it was a lot of work, so I decided to wait and ask the “commissioner” what she wanted before I put in all the work and she liked it better with the cartoony clouds.
the beginnings of texture.
I’m glad I waited. She liked the plain look better. That saved me a lot of extra work. So I just painted over the one I added detail to, and we moved on to my ceiling.
Ahh, a landscape one!
I wish I could capture the color better. It’s soooo pretty! Dusky greyish purple, called Diplomat on the little sample card I had. I taped off a chunk of my ceiling 15″ from the wall, and cut the corners at 45º angles, except for the wall with the door, there I followed the angle of the door. I’m going to come back in after we get settled and add trim around the paint, so I wasn’t worried about little spillovers. It looks so fancy! You have got to understand that most of my life, houses have been functional, but rarely pretty. I feel like I’m joining the big world, now!
Can we say VERY purple? I think it’s way way too purple, but she loves it. And I don’t have to see it that often, since its the same wall as the door (I planned it that way on purpose. With such a bold color, you need it not to jump out at you until you’ve gone into her room).
She had been begging me for zebra stripes on her wall, along with purple and teal and red and green. I was woried it’d all be too busy, so I agreed to a color-on-color satin-on-matte zebra print. Crazy, but she’s still got all of her teenage years to enjoy the crazy, so I think it’ll be okay. And she’s stuck with purple zebra stripes her entire teen years, because it’s gonna be a pain to paint over.
I’m pretty proud of this wall. I’ve gotta go in and touch up where the ceiling meets the wall, but that can happen when we’re less harried trying to get everything ready to move in.
Oh, and FYI, the color reading machine at Lowe’s is way better than the human eye. We went in with two fabric samples that match what we picked out for her room. I handed the first sample to him, he made the color, and we were fine. Then he lost the code before he got to the satin, so I handed him the other sample, not thinking about it. To my eye, they were the same color. But the paint reader picked up a difference. So instead of color-on-color, the stripes are slightly, ever so slightly, more red. And a little lighter. It still looks good, though. And it looks like it is on purpose, so we’ll go with it.
I also painted my wall grey, but I didn’t get a picture of it. And I’m not taking a picture now. You’ll just have to see it when I brag about being all moved in.
But the Pièce de résistance, at least according to this zebra-fanatic kiddo, is a light switch cover. You wouldn’t believe the hug I got along with the jumping for joy and the “I love it, I love it, ILOVEIT!” that came from her room.
The silly thing is, it’s just decorative tape on the old light cover. I’ve had it for a while, and hand’t found the right project to make my foray into this whole “decorative tape” movement, so I actually did it on a whim. With that response, I might do it again.
Anyway, We’re getting the beginnings of carpet in right now, so the house is coming together nicely. I’m soooo ready to move in! I’m loving this house. Even with it’s setbacks (still no light in the master bath. Seriously, why didn’t our inspector say something?).
See that big ol’ piece of glass? No, not all the bugs and yuck (seriously, living in the country means a million more bugs!), that big chunk of glass in the middle there…
Well it should be right here…
But it’s not. So that means new windows! Yay! Lucky for us, they’re included in our loan. The contractors came out and installed them.
Now all we need is the carpet and we can move in! I’ve got some painting to do before they lay the carpet, though. I’d rather touch up a few scratches from the carpet than to spill paint on new floors!
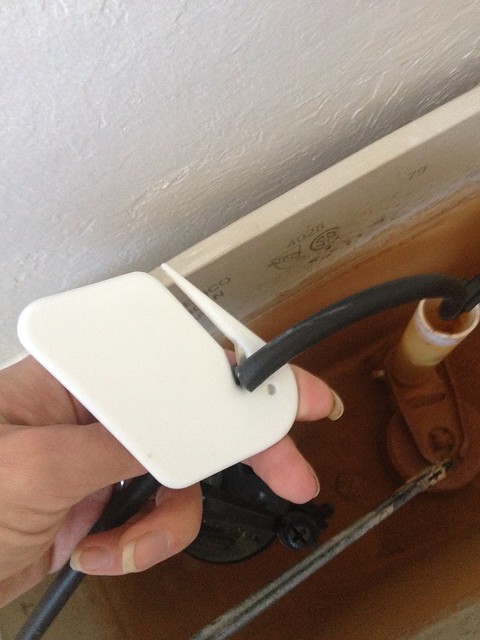
You know how I said we fixed the toilets ourselves? Paid for and installed the parts ourselves…
Well, I go to fix up the place before carpet gets installed and this is what greets me:
Isn’t the inside of this basin so pretty? I’ve noticed that all of this town has bright orange water. I’m researching filters, but our well tested fine.
Not only did he take the part that I paid for myself, he also clipped the chain on the toilet lever. Why? I have no idea.
It didn’t stop there. Someone also took the shower fixtures.
And the light over the garage. And the hoses in the yard.
I know that most of it’s no big deal. The only thing that really bothers me is the toilet mechanics I installed myself. But it just seems petty. And technically, it’s illegal. If it wasn’t in the contract, it is supposed to stay.
It really frustrates me because we love this house, but it feels more and more like this seller (or someone else) is sabotaging it. I changed the locks, so we’ll see if that is the end of it. It’s just a shame that something we’re so excited about is getting numerous kinks because of such a dishonest someone.
Not letting that stop us, I have spent this last week scrubbing and disinfecting and mopping and more disinfecting. No one told me that they added bleach down the well (I still can’t figure out why if the tests came back in good standing), so I am also sporting fingernails broken clear down to the quick. They hurt. I’ve never been the type to bite my nails, so I have rarely had to deal with the pain of them that short. Not fun.
But it works out, because since this house has been vacant for a while, anyway, I’ve got to let the water run. Mostly because this is not appealing:
While I was letting the water run, I got to play Rosie again. I have much more free-time than Ranger, with his work schedule, and it was kind of fun feeling all handy.
In the process of cleaning, we decided to add some contact-paper to the shelves. It was the only way to cover all of the previous owners’ stains. Seriously. Some things are just not going to be clean enough. We wanted a fresh layer.
The drawer with the new contact paper was the dirtiest, and the drawer below (which now has contact paper) was the cleanest. I like the look.
I fixed this cracked joint under the kitchen sink,
And pretty much every sink in this entire house. The guy must not have understood the concept of plumber’s tape (or putty). Every fixture leaked. I had to go buy myself a basin wrench. Among a million other purchases, lately. Lets just say Lowe’s knows me by name, now…
I re-fixed the toilet. But I didn’t have anything sharp to cut the new hose. It’s a good thing we just signed on a house and the letter-opener from the title company was still in my purse!
I put a light/lamp back in our bathroom…
To discover that there is no power…. none at all in the master bath. So the fan was a waste. I used a little multi-tester and we’ve discovered that there is power coming from the breaker (which is actually a huge bummer, because if there wasn’t it would have been an easy fix), but there is no power going to any of the bathroom fixtures. My dad (Mr. Handyman himself) says it’s probably just one outlet causing all of the others to short out, but it’s beyond Ranger and I. Time to call in a pro. Dang it.
The joys of being homeowners.
Tomorrow we get windows, though, and that will be exciting! Just a little bit longer. While they’re putting in windows, I get to paint.
Starting with the floors! Nothing like an old house, eh? The contractors we talked to recommended it for old houses. Especially houses in run-down conditions like ours is.
I heard this parable in a support group, once. I can’t find any sources, so this is just how I remember it.
Life can be be compared to a swimming pool. Emotions are equal to water and being able to process emotions is the equivalent of swimming. Some people are natural swimmers, born to families of natural swimmers, but some don’t ever learn how to swim. We start out clinging to the wall. It’s safe. Sturdy. But we get bored of that (about the time we turn into teenagers.) and want to learn to swim. There’s obviously more fun going on in the middle of the pool. So we dive in. The natural swimmers just take off and make it to the middle, treading water and having fun. Some people teach themselves to swim. Some get lessons. And some panic and cling onto whomever is nearest. The only problem is, the other person can’t swim when we cling on! At first, they’re excited to have you in the pool. they may even think it’s fun to have you clinging onto them. But once they start drowning, they don’t think it’s so cool anymore. So they push. Gently at first. But when that doesn’t work, they shove. And they shove hard. They will do whatever it takes to get you off of them. And you’ll do whatever it takes to keep hold of them. Because otherwise you drown.
When it’s finally sunken in (ignore the pun) that this person isn’t going to let you cling anymore, you have 2 choices. Cling to someone else, or face your fears and learn to swim. If you cling to someone else, you’re gonna end up drowning again.You need to learn to swim on your own. And that’s when the pool really is fun – when there are others, also swimming on their own. But they all have to know how to swim.
I think I love this recipe. Mostly because I can’t handle commercial pectin that tends to be full of corn. It was my first batch of pectin (I mostly borrowed the recipe from pick-your-own but I love the information provided by Forager’s Harvest (The site has had a major overhaul since I first found it, so it’s not as useful, now, but still good for a read). I highly recommend reading both links before trying out your pectin. I didn’t cook my pectin long enough, so it’s kind of soupy still. Next year I’ll boil it longer. I also want to make citrus pectin, but I keep procrastinating. Some day.
Apple Pectin
Recipe Type: Canning
Cuisine: Whole
Author: Keira @ Searchforseven.com
Prep time:
Cook time:
Total time:
Ingredients
3 lb unripe apples
4 cups water
2 T lemon juice
Instructions
Cut any yucky spots out of your apples. Cores and stems are fine. Bruises are okay, but from what I understand, they are not going to help the pectin set up, as they don’t have any. They are good for applesauce, though, so I keep them in. Cut the apples into chunks (quarters for bigger apples. It doesn’t really matter on shape, just try to get them fairly uniform.
Place apples into a large pot. Pour in water and lemon juice. Simmer until the apples are completely tender, but not a big pile of mush (about 30 minutes).
Strain the results through a jelly bag to extract only the liquid. I don’t have a jelly bag, because I’m not sure I want one until I’m in the middle of doing something like this, then I always debate about getting one. I just line a bucket with a few layers of cheese cloth with enough hanging over the sides that I can squeeze the big gooey apple blob when it doesn’t drip fast enough for my standards. Many people don’t like squeezing out extra liquid because it makes the jams/jellies cloudy. I say get as much out of it as you can.
Set the apple mass aside (I use it for applesauce later in the season. It’s a little bit tart, but I just mix it with a little sweeter variety of apple). Return liquid to the pot. Boil the strained liquid until reduced by half. Stir occasionally. You want to avoid getting a film. Test the pectin periodically to see if it will set up. You will need to cool the pectin. Some sources say put a bowl in the freezer, others place a spoon on top of an ice cube. either way, cool a bit of the pectin and then add a swish of rubbing alcohol. If it stays set up, it’s good. If it still spreads out, keep reducing.
Let cool.
Some people process the pectin in a jar, but I can’t find processing time. I just freeze mine. I think it saves a step. Plus, then I can get exactly how much I need instead of having to open a whole bottle.
My last trial of strawberry jam, I actually followed someone else’s recipe. Katharine from Allrecipes had her version of strawberry jam, and it followed a few others, so I tried it. I like that it doesn’t have pectin. However, it was WAY too sweet. Next year, when I make it, I will use less sugar. It means more processing time in order to get it set up, but I might just add some homemade pectin, too. I’ll see what the year brings.
In all of my trying new recipes, I came across a recipe that called for lemon rind in the strawberry jam. I found it intriguing, so I added lime to my strawberry jam. I used apple pectin, because I was in a hurry to get them done, but next year I’m going to use citrus pectin. It makes much more sense to keep citrus with citrus.
Strawberry Lime Jam
Recipe Type: Canning
Cuisine: Whole
Author: Keira @ Searchforseven.com
Prep time:
Cook time:
Total time:
Serves: 8 half-pints
Ingredients
5 cups crushed strawberries (about 5 lbs)
1/4 cup lime juice
3 cups sugar (more, to taste. I don’t like super-sweet jam)
zest from 1 lime
apple pectin (amount varies by product)
Instructions
Combine strawberries and lime juice in saucepan. Bring mixture to a simmer.
Add a cube at a time of frozen apple pectin. Test the pectin level by placing 1 tablespoon of rubbing alcohol in a small bowl and adding a few drops of your simmered fruit. A low-pectin mixture creates little strings of pectin while a high pectin mixture will form a single little blob. since we haven’t added the sugar yet, we don’t quite need the blob, but we definitely want it to hold its shape pretty well.
Add sugar, stirring to dissolve. Return to a full rolling boil. Boil hard 3 minutes, stirring constantly (I have to turn my stove down slightly). Remove from heat.
Pour hot jam into jars. Jams usually need 1/4 inch headspace. Wipe rim. place heated lid onto jar, and spin on a ring.
Water-bath process for 15 minutes (10 for sea-level).
I’ve been experimenting with different preservation techniques over the past few years. I’m not really a jam/jelly fan, and I think it is because of all of the corn included in commercial pectin. I know there are other sources for pectin, and I have heard good reviews, but I haven’t purchased any yet. For now, I’m trying recipes that don’t call for pectin or using homemade pectin. The nice thing about preserves is that they are cooked down, so that they don’t require additional pectin to set up. And preserves just sound fancy. The drawbacks to preserves are that it 1) takes WAY more time (1-2 days!) and 2) the longer you cook a fruit, the more you break down the nutritional benefits within the fruit. I guess it’s a toss-up. less sugar and corny ingredients. More nutritional breakdown.
That’s why you make some of each, right?
I haven’t opened the jars yet, but they sure look purdy.
Strawberry Preserves
Author: Keira @ Searchforseven.com
Prep time:
Cook time:
Total time:
Serves: 4 half-pints
Ingredients
3 lbs rinsed and hulled strawberries
2-5 cups sugar (to taste. I like mine less sweet. It does make it a softer set, though)
1/3 c strained fresh lemon juice [bottled has more consistent Ph, but I can’t have the sulfur preservatives]
Instructions
Layer the strawberries and sugar in a large bowl. Cover and refrigerate overnight, or at least 3 hrs.
Transfer strawberries and sugar in 6-8 qt saucepan. Bring to boil over medium heat, stirring occasionally, being careful to not break up the fruit. Cook until sugar dissolves.
Add lemon juice [I had to add the lemon juice before the sugar dissolved because it was just caramelizing the sugar. I think my strawberries were too fresh]. Bring to boil and cook to jelly stage220°, approximately 30 minutes
Pour into cake pan. Let stand uncovered in cool place for 12-24 hrs.
Return to saucepan and bring fruit and syrup to a boil.
Remove from heat, skim foam. Immediately fill hot sterile ½ pt jars leaving ¼” head-space. Carefully remove trapped air bubbles with non-metallic tool (I use the end of a plastic spoon. You can also use a chopstick or canning knife
Wipe jars clean, add lids and rings, and process in water-bath for 10 minutes [5 minutes at sea-level].
Notes
If you like more solid strawberries, you can boil for 10 minutes, strain juice, and then cook down the juice for another 15 minutes. I didn’t do this, but I might, after I try how these came out.[br]I double the recipe when I make it. It works just fine doubled.
3.2.2802
Manage Cookie Consent
I don't really understand cookies but I have some programs that use them for security purposes. I'm trying to follow legal requirements and tell you that. Consenting to these technologies will allow all of the features to run smoothly but I don't use them personally. Not consenting or withdrawing consent, may adversely affect certain features and functions.
Functional
Always active
The technical storage or access is strictly necessary for the legitimate purpose of enabling the use of a specific service explicitly requested by the subscriber or user, or for the sole purpose of carrying out the transmission of a communication over an electronic communications network.
Preferences
The technical storage or access is necessary for the legitimate purpose of storing preferences that are not requested by the subscriber or user.
Statistics
The technical storage or access that is used exclusively for statistical purposes.The technical storage or access that is used exclusively for anonymous statistical purposes. Without a subpoena, voluntary compliance on the part of your Internet Service Provider, or additional records from a third party, information stored or retrieved for this purpose alone cannot usually be used to identify you.
Marketing
The technical storage or access is required to create user profiles to send advertising, or to track the user on a website or across several websites for similar marketing purposes.


 I’ve been experimenting with different preservation techniques over the past few years. I’m not really a jam/jelly fan, and I think it is because of all of the corn included in commercial pectin. I know there are other sources for pectin, and I have heard good reviews, but I haven’t purchased any yet. For now, I’m trying recipes that don’t call for pectin or using homemade pectin. The nice thing about preserves is that they are cooked down, so that they don’t require additional pectin to set up. And preserves just sound fancy. The drawbacks to preserves are that it 1) takes WAY more time (1-2 days!) and 2) the longer you cook a fruit, the more you break down the nutritional benefits within the fruit. I guess it’s a toss-up. less sugar and corny ingredients. More nutritional breakdown.