Kids Need Play

Toddler In and Out game

Dear reader,

I don’t know about you, but we’ve had one heck of a week with our brand new toddlers! Between growth spurts and *more* ear infections, we’ve had some crabby babies on our hands. Luckily, babies love a good “game.” Mommy interactions, playing with toys we don’t always play with, and simple skills challenges all put babies in better moods. Or at least distract them from the pain and frustration.

It’s pretty easy, actually. Put a bunch of toys in a container and practice putting the toys in and pulling them out! Babies and young toddlers are fascinated with the concept of where a toy goes when it “disappears” out of their sight, and are excitedly learning the concept of object permanence, so there’s not much prep involved to keep a toddler entertained. First, let them empty the container. Then fill it! Then, maybe a little of both! The think that I love about toddlers is that as long as you’re playing with them, there’s no way to lose!

But honestly, to be real, it’s just nice to have something easy to do to keep toddlers entertained and busy for a few minutes. Next to looking after the terrorizing of everything else in the house, picking up the balls after they’ve lost interest in the “game” is easy. I was worried as to whether I lost my sanity when I bought 1000 ball pit balls from Amazon. But so far (and by only bringing out a few at a time), they’ve been a fun distraction. By all means, though, I realize that most of the world doesn’t have ball pit balls at their disposal, nor am I advocating going out and buying 1000 of them, though if you do, I won’t think you’re crazy. Please, just know, this activity works with any toys and any container. And please, lemme know if you try it!

Keira at searchforseven.com
Kids Need Play

Paperclip Jewelry

Summer has sure seemed to go both too fast and too slow. I confess that for me, even with Covid, it has gone too fast. I love summertime, and I love spending time with my family; working and playing together. Which is why we (my sister and I) decided that we wanted to become a little more on-purpose with our kids. We decided to start doing the activities – breaking them into activities for toddlers and activities for preschool – and to keep us a little more committed, to share them here, on my blog.

The first activity I did with my preschooler was to make paperclip jewelry. It was actually kind of fun, and I could see so many ways that it was a great learning activity. We worked on pattern skills, the pincer grasp, colors, and math, all in one activity. And it cost me nothing but time to sit down and build them with her. I had colored paperclips, which I highly recommend for this activity, but it would still be fun with the basic metal ones. With colored ones, though, you can work on colors and patterns. My daughter’s favorite colors right now are pink and green, so it should come as no surprise that when picking out colors, she went with those choices. I liked that she chose 2 because that gave us a great opportunity to work on simple patterns. She knows what patterns are but hasn’t really worked with them that often, and I feel like knowing the concept of something and actually using it are 2 different things, so it was good to put her pattern skills to use.

paperclip jewelry pattern skills

after I pulled out all the pink and green clips from my stash, we put them in order together. I’m sure we could have played with patterns longer, but she was happy with a simple AB order, and honestly it worked for me, so we went with it. then came assembly time!

It took her a little while to get the hang of connecting the paperclips, she kept sliding the whole clips through each other instead of slipping an end through a loop, but she figured it out, and it wasn’t that much trouble to help her. I had her count how many went round her wrist and it took 6 paperclips to go around her wrist. I don’t think she really cared, but it seemed like a good time to slip a little subtle math and measuring concepts in.

All in all, it was super easy, and we had lots of fun. she wore her bracelet all day while we were out running errands, and when we got home she wanted to take it apart so we could do it again another time. I think that it is definitely something we will do over and over again, because it’s not really hard to pull out the little plastic container of paperclips and put a few together.

Educational

I made another thing…

Okay, so I know it’s been too long for this. Isn’t it always? But I’ve been chasing a toddler around. And working on Etsy, and, well, living! But Life is changing a bunch right now. In case you didn’t know, I’m expecting twins at the end of the summer. I’ve had a lot of people ask me if they’re fraternal or identical and they get confused when I tell them I don’t know. For now, I know they’re di/di. That means they have their own placentas and their own amniotic sac. Both are reassuring, because it means they have less chance of getting their cords tangled or having a problem with the placenta not distributing nutrients properly (that is the extremely short answer. Just know that I am glad they’re di/di, since I’m a nervous Nelly). To help with some of the confusion about twins and whether they’re identical or fraternal, I’ve made a chart. I like making charts. Anyway, feel free to share this image. Knowledge is power.

How to tell if twins are identical or fraternal

Entrepreneur ramblings, Life Lessons

They say get out of my comfort zone…

I’ve been staring at a blank screen for about 17 minutes. I’m taking this entrepreneur class (That I didn’t sign up for. My husband thought it’d be a good idea. Of course, he doesn’t understand social anxiety. Or that I’m quite happy with not having a large business/following. Or that I don’t like being told what to do), and go figure, the first two assignments are to write  down our thoughts each day for the week (until the next class) and to… TALK to people.

I used to be really good at talking to people. Like, really good. I had lots of friends, knew things most people don’t often mention about themselves, and just clicked with anyone I came in contact with. But I’m not that way anymore. People scare me. I’ve told myself long enough that I don’t need people that I’ve definitely started believing it. When thrown in a social situation, I just feel awkward. I am pretty good at reading people, or at least I used to be, and honestly, the feedback I get when I do read them just confirms it. I’m awkward. Whether they’re really thinking that or I just need a paradigm switch, I’m not sure. But at any rate, attending the class is scary enough. But to add the requirement to talk to people is terrifying. I don’t wanna do it.

But I’m stubborn. And even though I was told I’d enjoy this class (He can’t make me enjoy it…) I’m still going. I’m still gonna do the assignments. Somehow. Maybe my attitude will miraculously change?

Another assignment is to go out on a limb and try to trade something small and of little value for something bigger and better. The group never mentioned names, but on doing a little digging, I know who to thank for this not-so-fun-for-an-anti-people-person assignment.

I don’t wanna. Like really. I don’t wanna! But in order to prove that I’m either gonna fail or succeed, I’ve gotta try. But it’s so dumb! I know that’s the wrong attitude, but I really don’t like gimmicks, and it’s soooo clearly a gimmick. I’m trying to decide if there’s a way I can do the experiment without actually leaving the house. Because not only do I not have the time to constantly drive into town (country girl, here), but I don’t have the sanity! But if I could do it all digital, would that count somehow? Mail is too slow. I only have a week. The problem with digital items is there’s no real way to actually trade. Someone could easily keep a copy of what is traded and trade up. And there’s so many copyright laws on digital stuff, so it’d all have to be original works. blah. Someone come do this part for me, k?

I think I might trade for skills. Like, it’s gotta be a service of some kind. I like that idea much better. I don’t know. And it’s late. So I’m gonna sleep on it. Night.

tutorials

Notes to self: Paper Piecing; The tutorials all failed me.

I’ve been paper piecing a quilt for my future niece (she’s already my niece, but she’s not on the outside yet…) and vowed never to volunteer to make a paper pieced quilt ever again on the first two blocks, but this morning (3 days after starting, to put it in perspective; 2 blocks, 3 days), I think I’ve finally figured it out! So, in case I ever decide to make a paper pieced quilt again, I thought I’d write a few tips to future-me. I hope future-you will find them useful too.

  1. First, if you think you’re a pro at quilting, paper piecing will question that belief. It really just feels backward to other quilting methods. It feels like backward math, upside down quilting, and a whole bunch of angles that are scary if you watch tutorials. Because they all make it look so easy, and then you sit down and it’s not and you may … ahem… think about saying a few things you don’t want your toddler to repeat.
  2. Secondly, there’s a reason that paper piecing is a major scrap-buster. It leaves a LOT of wasted fabric. It feels like you’re cutting in the middle of the fabric. And if you’re a regular quilter, it makes you cringe. But… It DOES use up scraps. And after a while, you can get the hang of finding the best placement for scraps.
  3. If you don’t have a light table, you will wish you did. Windows and holding it up to the light will make it about 5 times harder than a light table. I got mine way cheap back in the day (it’s probably 15 years old. A quick Amazon search proves that mine is WAY out dated and that they have come a long way in design aspects. But hey, it still works. Unless you press too hard. Then it shorts and you have to press hard again to “turn it back on.”
  4. If the pieces don’t have a seam allowance added to the outside, add them. And don’t forget to keep them in your calculations for the middle of the semi-blocks.
  5. This one is kind of a given, but order is important. Not just in pieces, but in method.
    1. First, line up your first piece. It’s usually the biggest. Most of the time, they’re numbered, but if you’re like me then you can’t be bothered to settle for something that’s not exactly the way you want it, so you either tweaked it or created your own. If it’s not pre-numbered, it’s [usually] pretty easy to figure out which piece to sew first. Find the piece that doesn’t require any other seam in place. I have one of the pieces I designed myself (after looking at pieces online, so it’s not really what I’d call an original) and it’s NOT the way the pieces should be, because there are 2 sections that require seams. Usually, you make the pieces so that doesn’t happen, but it’s not a terrible fix when you know what you’re doing (or figure it out as  you go, as Yours Truly likes to do). It’s just not able to be it’s own little box, really. Still sews the same. I just have to remember there’s no seam allowance on that part.
      New photo by Keira / Google Photos
    2. Glue it in place (tutorial taught me that. I don’t like glue for anything but the first piece (unless it’s really small, which also seems backward. But when the small pieces slip, it’s much more noticeable. If you’re gluing more than the first piece, sew it, iron it open, and then glue it to the paper), but some tutorials say glue the whole way. It is helpful for keeping the piece in place, but it also gums up your iron, and then you have a brown spot in the middle of your project that won’t come out until you wash it. At least it had BETTER come out… haven’t washed it yet…) WITH THE BACK FACING THE BLOCK (it feels backward. We are taught right-sides-together for most of sewing, but technically, this step is wrong sides together. Tutorials DIDN’T teach me that tidbit. You’re welcome).
    3. Using the light table, take another scrap (or in my case, the background color, that is about the size of a fat quarter. Not the easiest size, which is part of my frustration, but I want all the background colors to be the same, and I only have so much of this scrap so I would rather not waste all of it willy-nilly. FOLD THE PIECE DOWN THE SEAM LINE! Seriously, that is the trick! It changed all my complication and frustration into an, “oh, this isn’t so bad!” Place that folded-glued piece of paper over the other fabric. LINE UP AN EDGE OF THE BACKGROUND FABRIC (Seriously. Saves cutting, guessing, and wasting). Using the light table (and your fingers to feel the seam if you can’t see it well, make sure that piece is all lined up and fits in the square (REMEMBERING 1/4″ SEAM ALLOWANCES ALL THE WAY AROUND, including the folded line). Lay the paper flat (unfold it), pin the 2 layers of fabric and the paper together.
      New video by Keira / Google Photos
      New photo by Keira / Google Photos

      gosh, my hands look so old in this picture. Dry weather is not my friend, apparently…

    4. Go to your cutting mat, take your acrylic ruler, and make sure you have 1/4″ seam allowances all the way around. Repin, if necessary. (if you have a flat light box, or a small acrylic ruler, this step can be done on the light table – which would be quite helpful – but I’m using my  big ruler and the light table is too awkwardly angled). No real cutting needs to happen at this stage.
    5. sew down the seam line.
    6. Iron the seam open (fold back the not-glued-down piece, iron flat. That’s another part that just seems backward. Normally you have a LOT more liberty as to which way you iron and almost always iron the piece to the darker side. In paper piecing, you don’t have the choice, and if you’re using a light background color, chances are you are ironing toward the background and it’ll show. DON’T CUT UNTIL YOU IRON.
    7. Fold the pattern at the next seam. Go to your cutting mat. Take your acrylic ruler and cut the scraps to 1/4″ from that fold.
    8. Place the next piece of fabric along the fold, making sure that you have enough fabric to handle anything folded over in the piece of paper (seriously, this step! Makes the difference between picking out with a few mutterings (for the 6th time) and getting it right the first time. FOLDING THE PAPER IS THE MOST HELPFUL ADVICE I CAN GIVE (aside from the whole measure-twice-cut-once rule. Because I had a few cut-the-scrap-i-needed-almost-clean-off moments…). It seems silly, but it isn’t. trust me.   Use the light table, if you need. Don’t forget seam allowances. unfold the paper, pin, sew.
    9.  Repeat steps 6-8 as needed.
  6. Never sew that seam unless you’ve already cut the seam to 1/4″. Once you’re in the hang of what you’re doing, it’s okay to ignore this rule, just be careful. And for best results, cut it BEFORE you iron it. I tried cutting seam allowances after I sew/iron and have accidentally cut the entire piece off (see above). I’ve also tried cutting the seam allowance before I iron and cut the piece the wrong shape because it’s hard to wrap your brain around what is quilt piece and what is seam allowance. If you already have a flat seam there, there’s no need to cut it and accidentally cut the wrong part until after it’s ironed. Once it’s ironed it’s sooo much easier to tell what should be there. Then, you’re cutting the next seam allowance, not your quilt piece.
  7. Got a piece that’s just perfect but doesn’t have flat edge where the seam allowance is? tread with caution. It’s doable. Remember to fold the paper over and make sure it all really does fit nicely. Then sew it, and be VERY careful what you cut. I made a little video of me doing it backward on one square. Just because it’s easier to show than to explain.
  8. Sew well into the next piece. Tutorials will say this but they don’t really explain why. I know of at least 2 reasons. 1) you have the seam allowance for those pieces becoming one piece on the next seam (you still need 1/4″ seam allowance. If you haven’t sewn all the way up, your quilt will either pull funny or unravel after it’s sewn. Both are bad. SECONDLY, when you pull the paper off of the pieces to sew the next seam, they tend to unravel. even at a small stitch, the first few stitches will probably come out.
  9. Which brings me to another tip: stitch length. The tutorials all say go to 1.0 stitch length. Well, they clearly haven’t had to pick out as many seams as I have over the past few days. I’ve found that 1.8 works just fine and I’m not ruining my fabric (or my ability to see straight) when I have to pick it out. ALSO: if your machine is like mine, it is much easier to tell where I’m going if I center the needle. My machine thinks it should always (ALWAYS) be on the left and that is one of my biggest pet peeves about a machine that I otherwise love (the other is that it does NOT like starting on the edge of the fabric. It can’t figure out how to feed it properly so I have to use pins to guide it through a few stitches. But that’s another story.)
  10. If you have a machine that automatically resets itself when you sew, it is worth leaving it on until you’re  done sewing for the day. Because otherwise, you’re guaranteed to forget to turn the stitches down and re-center the needle. This goes against a major rule my mother taught me. But if I leave the presser foot up my machine wont sew, so my toddler won’t accidentally sew her fingers. I think that was one of the main reasons she always made us turn it off the second we stood up.
  11. If you don’t have a garbage you can slip right under your table/cutting surface, tape a grocery bag to the edge of the table, then you can slide your scraps and discarded paper right into the trash.
    New photo by Keira / Google Photos
  12. I’ve learned that it helps when tearing the paper out of seam so that you can move on to the next seam (where you sewed past the line on purpose), if you tear it from the side it unravels a little less than if you tear it from the last stitch. And if you’re having trouble removing the paper at the end, spraying it with a FINE mist of water will weaken the paper enough it comes right out.

What do you think, clear as mud, right? Well it’s definitely one of those its-easier-when-you-start kind of projects. And don’t work on the most important one first. Practice on an eaiser/not as prominent piece first.

Life Lessons, Spiritual

Integrity

I was flipping through my Personal Progress book on Sunday, and a particular “experience” (Integrity #3) really stuck out to me. I don’t know why, exactly. Usually, I think, “yeah, that one should be easy enough right now.” or “um, I should probably work on that one.” or something to that effect. But they don’t usually hit a chord. This one did. So I’ve been working on it this morning. Instead of writing it down in my journal, the thought came to me that I should put it on the blog. It says share your experience, so I guess this is a good way to share it.

The funny thing is, when the instructions said to think about a time that I showed integrity and it was not easy or popular, a story instantly came to mind. An incident that was close to 20 years ago. I don’t know what recalled that particular instant, but it hasn’t left me since.

I was in 8th grade. We had this really boring text book in my Leadership class. The whole class hated it. One day, the teacher stepped out of the room, probably to go make copies or something. The entire class hid their textbooks. The teacher was pretty flabbergasted when she came back in. I don’t know what made her do it, but she looked right at me and said, “Keira, where are the books.” Althought I didn’t stand up and tell the kids no (they were reaaaallllly boring books), I couldn’t tell a  bold-face lie. So I caved and told her where they were. I thought for sure, the whole class would be mad at me, but actually no one was. Maybe because they knew I couldn’t like. I don’t know. But we didn’t have to use those books again. And the class didn’t really care. I don’t know why it’s so ingrained into my memory, but it is. I don’t remember a single other thing from that class, but I remember the time I didn’t lie.

Integrity Scrabble Brick

It’s no surprise that the first example the Young Women Personal Progress book gives is that of the Savior. Even when He realized exactly how hard it was to comply with the atonement, He did it. He suffered for our sins. If He hadn’t had integrity, there would be no plan.

Joseph showed integrity with Potiphar’s wife. To me, that’s not just showing integrity in the obvious way. Not committing adultery is a definite  commandment. But honoring the wishes of an employer and getting out of a potentially bad situation (as well as making a bad situation good without complaint) are also ways to show integrity.

Esther is one of my favorite examples of integrity. I don’t know if I’d have the courage to put my life on the line to stand up for others. I mean, I guess you’d just have to do it. I like that she fasts and prays before she does what she does. In this kind of situation, putting God at the central part of the plan, remembering that all things are possible through him, is the real example of integrity in Esther’s story.

Job never denied the Lord, when times got hard. I think that everyone has those moments when they wonder, with everything going on in their lives, if God loves them, if He really exists, and if He can help. But at the end of it, if you’ve kept the faith, kept believing, then you can show integrity, too. Just like Job.

Daniel didn’t stop praying. God’s commandments are greater than man’s.

Shadrach Meshach and Abednego were willing to die for their faith, but to me the true sign of integrity is something I heard in a conference talk once. I’ve never been able to find it since. In the talk the speaker said once that Shadrach Meshach and Abednego were great examples of the “But If Not” principle. Not only do they stand up for their beliefs, knowing that Christ CAN save them, they know that doesn’t mean Christ WILL save them. The true act of faith, and integrity, is remembering that God’s ways are better than our own plans. They know that they can be saved, but if they are not saved, they know that they will be with their Savior. “But if Not.” Integrity is trusting God. Submitting to His will.

Hyrum showed integrity for delighting in truth and finding what is right.

Paul showed integrity for changing his ways when he knew better. For adimitting he was wrong. That’s a big one!

Joseph Smith showed integrity by never denying what he had seen. “I knew it and I knew that God knew it.” How easy it would have been for him to just give into the world, “yeah, guys, you caught me.” But just because something is easy with Man doesn’t mean its easy with God. Giving into what the world wanted him to do would have eternal repercussions. It would NOT have been worth it. Easy and worth it are definitely not the same thing.

Brag

Rainbow Baby Shower

In case you didn’t know, my sister lost her first baby a few years ago. Adella would be turning 5 this year. When my sister had her second daughter, we threw her a rainbow-themed baby shower.  Here are some pics from her shower.

Rainbow baby shower

Baby Shower favors: soft salts. We made a huge batch, divvied them up into these snack bowls, and used double-sided tape to add favor labels (now available on my etsy store).

Rainbow baby shower

The nice thing about this baby letter-guessing game is that it makes a gorgeous room accent. Inside each of these bags is a baby item that starts with that letter.

  • R=rattle
  • A= applesauce
  • I= infant Tylenol
  • N= night light
  • B= bottle
  • O= outfit
  • W= washcloth
  • B= bib
  • A= afghan
  • B= book
  • Y= yarn

yeah, infant Tylenol is a stretch, but can you think of something that starts with an I? Besides, it’s more of a challenge, right?

Rainbow baby shower

We used these clothing items underneath the bags. I didn’t get a picture of them together. My mom made the first 3 things – the red dress, the crocheted sweater, and the little skirt. I found the other 3 on a great sale at Walmart ($1/piece!)

Rainbow baby shower

I made up these game pamphlets and a keepsake page for my sister to keep in her  baby book.

Rainbow baby shower

Rainbow napkins equal party win

Rainbow baby shower

My sister is allergic to corn, so she got a cupcake without a rainbow and everyone else got frosting made without powdered sugar. It was a pain, honestly.

Rainbow baby shower

We served Hot Chocolate and had a hot chocolate bar with something in every color. The blue element is home-made marshmallows (using tapioca starch for powdered sugar/corn starch. These were de-LISH-ous. I’ve made them multiple times since. The shape is actually a pumpkin, but I think it passes as a cloud. What do you think? The dish on the side is mint syrup (For the green element). We had raspberry jam for red, orange was made with pumpkin spice, caramel counted for yellow, and huckleberry syrup was our purple element.

Rainbow baby shower

these are our St. Patrick’s Day decorations. They worked pretty well as decor around the room. The white clouds from balloons just added that much more charm.

Rainbow baby shower

rainbow food table. There was a layered salad in the bowl, and taco bites went on the platter. I honestly don’t remember what went in the glass pan.

Rainbow baby shower

I made the rock candy myself. I need to improve, that’s for sure. My crystals didn’t get as big, and the color wasn’t as bold as those you can find in the stores. They tasted okay, though.

Rainbow baby shower

We played the candy game, where you are given a phrase tied to babies and pregnancy, and you have to guess what candy is tied to it. I had an added challenge (to take more time), guests had to play memory with numbered cards on a poster board. Guests took turns calling out numbers, and I flipped the cards over. When they made a match, they had a chance to guess what that phrase had to do with the candy. This is what we came up with:

the daddy big hunk
choosing baby’s name whatchamcacallit
girl’s name baby ruth
twins mike n ike
contractions now n later
hospital address 5th avenue
driving to the hospital rocky road
maternity nurses sweet tarts
hospital bills 100 grand
triplets 3 musketeers
11 lb babies whoppers
chunky baby rollos
time alone zero
nap time Fast break
baby giggles snickers
diapers, formula, medicine payday
lullabyes symphony
teething crunch
new babies treasures
ultrasound look
preemies runts
collic cry babies
postpartum tears gushers
loves for baby kisses
christmas baby junior mints
loaded diapers toosie rolls
mommy brain airheads
doctor life savers
Baby bump mounds

I’m sure you could play with the candy on one card and the baby phrase on the other. It’d be shorter. Up to you.

Rainbow baby shower

we also had the guests paint peg people for baby to play with when she gets a little older. I think they turned out pretty cute! I painted the guy in the suit in the back, and the orange girl  and Harry Potter with the extra pegs.

Rainbow baby shower

Life Lessons, Spiritual

He’s my Prophet

New photo by Keira / Google Photos

In case you didn’t hear, my Church called a new President. We really believe that God has given us a new prophet after the death of President Thomas S. Monson. It wasn’t any surprise to us that it is now President Russel M. Nelson as the prophet of God. A friend summed it up nicely when he said, “Only in the Mormon church would they replace a 90-year-old man with a 93-year-old man!” But unlike a popularity contest or a democratic vote, there’s a system set up as to whom our next prophet will be. There’s still room for change in that system, but I highly doubt we’ll ever see it deviate. Our church is quite proud of being a “house of order.”

I’m sure everyone has or will have their own experience about our new Prophet and that he is called from God (if not, I invite you to), but I wanted to write my own witness down in a place I would easily come back to and re-read. There was both a special virtual meeting for the members and a press conference to announce who would be our new Prophet/President. I actually watched it 15 minutes behind everyone else because I didn’t keep track of the time (I wish that wasn’t as common as it is. Just glad watching it right behind everyone was even possible). The whole member portion of the broadcast was fine, not really a surprise, but still interesting. It was nice hearing each of the called First Presidency address us. Elder Oaks has always been a powerhouse, and Elder Eyering is my daughter’s favorite. I loved President Uchdorf, too – who is now back in the quorum of the 12, just like when we rearrange a Young Women Presidency – but it seemed like he was everyone’s favorite and was utilized a LOT, so I’m excited to see a change. He will do well in his new assignment. As far as my previous feelings toward President Nelson: He trained the man who saved my grandfather’s life, so there’s that. But that’s not a testimony. That’s knowing he’s a world-renown surgeon and a pioneer in his field.

At the broadcast their messages to the members were all nice. I’m happy that Elder Oaks (President Oaks) let us all know that even though President Nelson is old, he’s still in excellent health and very active. Once again, he’s 93!

Then, there was a news conference where they took a few questions. It was such a juxtaposition to see the things interesting to the Saints and the things interesting to the news media. They wanted to know if his opinion was any different than the previous prophet. Members of the Church were not surprised to be reminded that it’s not President Nelson’s opinion that matters. It’s God’s opinion. Which is the same with President Nelson as it was for President Monson. I loved watching President Nelson put people first over and over in his answers. He talked about how he knew the newscasters before he ever answered their questions. Sometimes he’d even forget the questions. Knowing and Loving the people is important to him. President Monson always said, “Never let a problem to be solved become more important than a person to be loved.” President Nelson exemplified this during the press conference.

One of the questions (an early question. No surprise. It’s what the Media has focused on) asked how President Nelson felt about LGBTQ agendas. When President Nelson’s response was that they are children of God and paused to let that soak in, my heart soared. I was thinking to myself, “of course that’s the question. But the answer wont change because it’s not his answer, it’s Gods.” And then hearing a reminder that everyone is a child of God… That is all it took for my testimony to find it’s roots. Not only did President Nelson zoom the focus back out to everyone – everyone is a child of God – but isn’t that always the answer? So many problems become minuscule when you remember that the person in question is important to Heavenly Father. The thing about testimonies is that it’s not just about the logical.  My testimony of the newest prophet of God isn’t just coming from my head. That’s the amazing thing about testimonies. Once the roots settle, your whole body, mind, and soul just … know. I know that President Nelson is a prophet of our church, my church. I know that he was called of God. He’s not just some old guy giving old-world advice. He is our Prophet. He is called of God. I look forward to a continued re-training of my thoughts as I hear his messages at conference. Thinking of him as more than a surgeon, but as the man that God has called to lead his church. He is just what God can use right now. He’s clear and concise and simple.

But mostly, He’s my Prophet.


Brag

First Freebie!

Our Young Women Presidency decided we wanted to give our girls a little extra challenge this year. We knew they needed a nudge to strengthen habits. And with the Olympics coming, we decided an Olympic theme would be an appropriate challenge theme. We didn’t want it to be easy. Habits don’t just happen. But since it’s not easy, there are only 3 goals. The first one is to read their scriptures for 120 CONSECUTIVE days. The Second goal is to say their prayers for 120 consecutive days. We also set the goal to attend the temple 8 times with their own names. Our ward is pretty close to the temple, so it shouldn’t be too hard of a goal. If you don’t live so close to a temple, you could just make it a goal to find 8 names that need temple work.

Anyway, I decided, since it’s pretty specific, I’d just make it a freebie instead of loading it up on Etsy.

New photo by Keira / Google Photos

At new beginnings, we will give each of our girls one of these bracelets

New photo by Keira / Google Photos

You can buy them at templesquares.com. I’ll add a little note that these are NOT the bracelets we ordered, but when they got here, we just went with it. They come with this little scripture charm on the leaf, but we took them off because they’ll earn the charm when they complete the goal.

New photo by Keira / Google Photos

They will also get a charm for saying their prayers, but we didn’t want that one to be earned until Girls’ Camp (they can complete it now, but we will have an award ceremony at GC to hand them out there). Our Girls’ Camp Director is ordering those, so I don’t have them.

We ordered our temple charms from Doodle Beads, and I love them! If you need a lot (like we did), I’d recommend you contact them (like I did). They were great to work with, prompt, and very approachable.

I’m sure you could come up with any goal prizes you wanted to. You could award charms or make it so if they earn all 3 goals, they get one big prize. In fact, I will be making a few bracelets of my own soon (clerical error, I have charms we aren’t using), and they’d make great prizes. I’ll post the Etsy link when I get that far.

Anyway, click on the picture and it should take you to google drive, if I did it right, and you can download the page there. If I did it wrong, lemme know. We’ll fix it. 😉

Brag

Charlie Sock Monkey Baby shower

Here are some pictures of my newest Etsy project from when I hosted a sock monkey baby shower for my little nephew. This is probably when I first realized that maybe what I was previously just playing with could actually be worth something. One of the guests told me it was the most Pinterest-worthy baby shower she’d ever attended. That filled up my brag-jar right away!

sock monkey 16

When the guests enter, this table is waiting for them. There are raindrops for guests to write a nice word or two for the mother-to-be, name tags that say who they are and how they know the baby. There’s a coloring page off the internet (sorry, don’t remember where  I got it. I just googled it, feel free to do the same) for the little guests, a jar full of baby socks we had everyone guess how many socks it had, and yarn we used all over the room because not only did it add color, but it tied everything together. You know, because sock monkeys are made of yarn. The folded papers have all the portions of the games that guests will need to write. There’s a game where guests need a letter, so the Bananagrams game is there for them to draw a letter. It’s fittingly… a banana. Each of the bags has a baby item in it. I wish I could remember what I included, but I did a lot of google searching for that, too.

sock monkey 15

I know, bad luck to open an umbrella inside, but it was so cute hanging these raindrops from it. I wish we could have hung it from the ceiling. Not bad enough to stick tacks into a place that’s not my own, though.

sock monkey 9

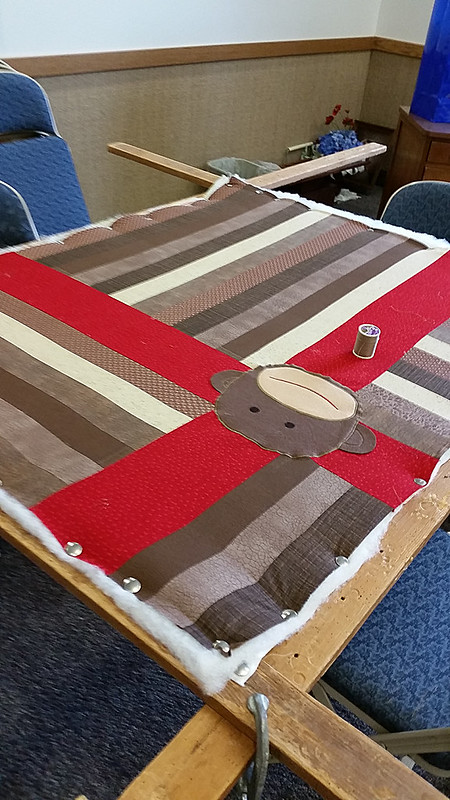
I made this quilt just like one I made for my niece (hers was an owl), the back was red, orange, brown, green and blue stripes, no kidding. How lucky that I found such fitting fabric!

sock monkey 14

Aside from the casual gathering and visiting, my favorite part of baby showers is most definitely the food! At the beginning of the food table, we placed all the utensils we’d need for the meal. Straws in varying shades of brown and red, utensils all bundled together with the napkin rings, and plates (Walmart. Once again, lucky purchase. The colors are perfect).

sock monkey1

sock monkey 13

sock monkey 12

We got the sock monkeys from Oriental Trading company.

sock monkey 10

The baby-momma said the only thing she really craved during her pregnancy was chicken, so we had little chicken salad bites.

sock monkey 6

and chicken pinwheels (sockful of monkeys is also from Oriental Trading)

Sock monkey 5

we also had trail mix (Jungle mix), banana bread, nachos, salad, and…

Sock monkey 4

Sock Monkey 3

these cheesecakes. Seriously, guys, these cheesecakes were amazing! I’ll have to post my own version of this recipe. I tweaked it to be corn-free. Seriously, guys. It was so rich! It tasted sooo good! you could only eat about one at a time (which is fine), but ohhh,  while it lasted!

Sock monkey 2

At the end of the shower, each guest got a cookie mix with M&M’s in it. We typed the instructions on the top. We had a few jars left over at the end. My family did not complain the random cookies for as long as the extras lasted.

sock monkey 8

sock monkey 7

Signs made by me. Monkey from Oriental Trading, again, but I’ve seen him elswhere, too.

sock monkey 6

So, what’d ya think? Like I said, this shower really gave me the confidence to think I could maybe design stuff to sell on Etsy. It’s there, now, if you’re interested. I should sound all cool and “I-got-this,” and say I’ve always known I was this good, but… sometimes it takes a push. If any readers buy the kit and use it for their own party, I’d love to see the pictures!